Painting Mountains in Watercolor

•April 11, 2022 • Leave a Comment

Today my friend Rene asked me “how would I paint this photo”. Because she is such a good friend I wanted to send her more than a quick explanation so I decided to make a blog post and create a step by step tutorial for her and for you.


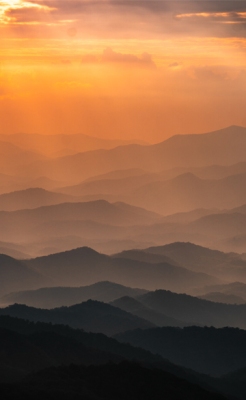
Photo by Triston Dunn on Unsplash

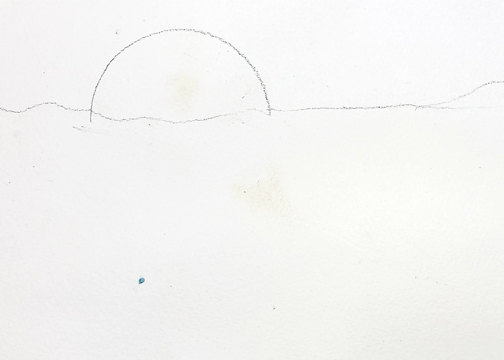
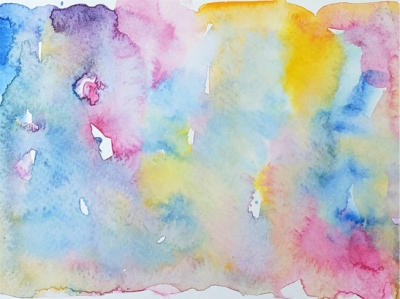
The first step was to pencil in the sun and the top mountain edge. Then I wet the entire top section except the sun shape. I used a combination of colors. Quinn Gold, Transparent Org, Cad Yellow & Pyrrol Red. I painted the area with these colors making sure to negative painted around the sun.

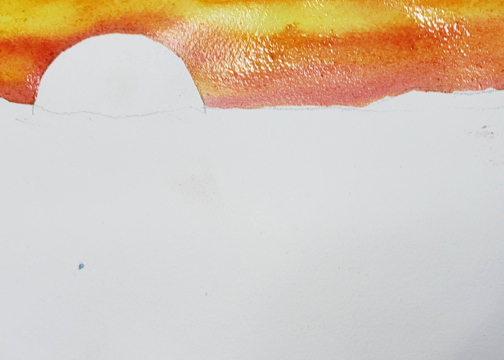
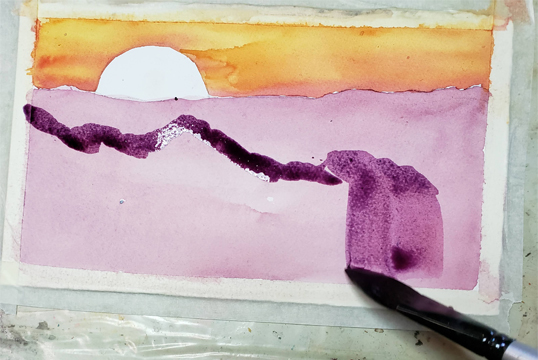
I mixed a light value of a purple color and when the paper was completely dry I painted from the top of the mountains to the bottom of the paper.

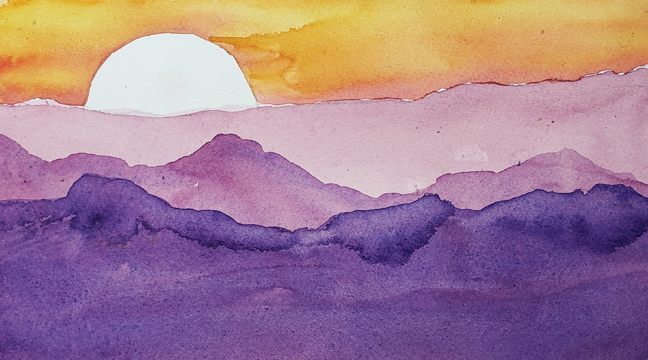
When the paper was completely dry I added more paint to the puddle on my palette to create a slightly darker value. Below the previous mountain line I painted a new layer of mountains. I continued layering each mountain range and darkening the value of the paint for each layer. Vary the shape of each mountain ridge to create interest. Make sure you bring the new layer to the bottom edge of the paper.

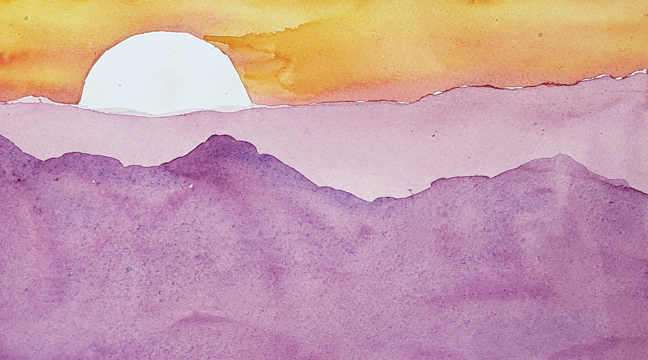
Add a transparent wash over the sun using a very diluted mix of the sky colors

Finish by painting the last/bottom mountains in the foreground using the darkest value.

The Blue Ridge Mountains at Sunrise Watercolor 5″x11″ by Lorraine Rimmelin 2022

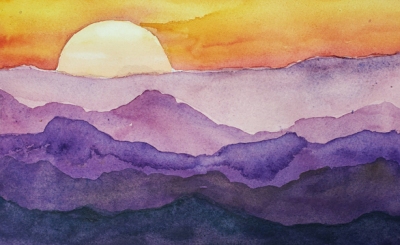
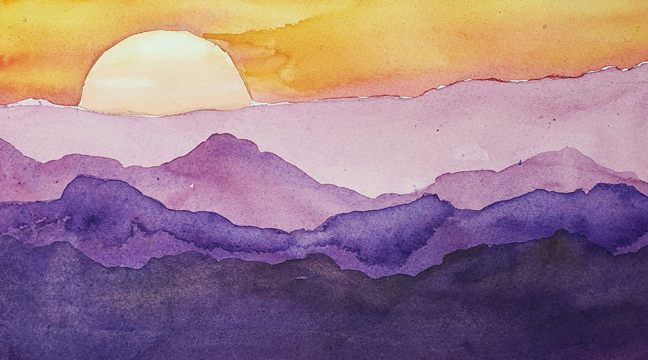
I would prefer if the top edge I painted first had more variety of shape, it’s a little too straight across and I feel it would be much more pleasing to view if it had some highs & lows. You can use deeper colors to set a different mood to your artwork. Adding the sun lead me to choosing brighter colors for this painting. I’m please with my rendition of the photo.

Thanks Rene for asking me to show you how I would paint this image. I tried to find the simplest approach and the easiest way for you to be successful when you paint this. Have fun and be sure to share your results with me.


You can follow me on YouTube at

https://www.youtube.com/c/LorraineRimmelinWaterColorArtisan

(don’t forget to subscribe to my channel & give my videos a thumbs up!)

Sign up for my newsletter to find out about my newest workshops and to receive discount codes for my online Zoom workshops.

http://www.watercolorartisan.com


Paint With Me

Lorraine

Choosing Color

•July 19, 2020 • 2 Comments

I’m sure you feel just like I do when I’m starting a new painting. You have a reference photo that inspires you, a clean white piece of W/C paper, lots of water and your favorite brushes that help make the magic happen. Now it’s time to select the colors for your painting. Sometime if I’m painting flowers I will hold the tube of paint next to the flower to compare the color.

I also want to explore how the colors mingle and flow with each other. I will bring my color choices out and blend them together on scrap W/C paper. Please don’t use a paper you wouldn’t normally paint on to try this, you will be disappointed with the results. I use the backs of old paintings or scraps of paper from cropped images.

If I find a palette that works for that painting I keep the color sample with the art until it’s finished. Now I will always know what colors I’m using on that individual artwork.


Group 1 Color Choices
Brilliant Org, Indian Y, Indian R, Cobalt Turquoise Lt, Mineral V
Color choices – Group 1 Brilliant Org – Indian Y – Indian R – Cobalt Turquoise Lt – Mineral V

As I change the dominant color the mood of the palette changes also. When the Indian Red is dominant the mood feels like a South West landscape. With the Mineral Violet dominant I can feel the coolness of a winter landscape and beautiful shadow mixes. If I make the Indian Yellow dominant I have the warm colors of sun shining on flowers. I could easily use this for my sunflower painting. The darker colors would work perfectly for the flower’s center. I have a good mix of yellow/orange/red for the petals & yellow/blue for the leaves.


Choosing colors shouldn’t be hard using this process. I have found wonderful color combinations totally by accident which have become some of my favorite mixes. I never throw out these little gems. Instead I keep them all in a large envelope for future color reference or color combination inspirations.


Now it’s your turn to have some fun. Pick a few colors and start blending them to see how they interact. Try them directly from the tube to see how dark they can be. I always make sure I have at least 1 color that can give me a very dark value. Add lots of water to change the value for creating a pale wash. I can spend endless hours exploring the colors on my palette but don’t forget to try those tubes of paint that never make it out of the draw or box. Get them out and you just might find your new favorite color combination.


Pouring Watercolor / Part 3

•September 2, 2019 • 2 Comments

Removing the masking fluid and completing the painting

Let’s remove the Masking Fluid

You can use a Frisket or mask removing tool that you can purchase at most art/craft stores. It resembles an eraser.
I start at the top of the painting working slowly to remove all the frisket.
It’s fun to unveil the layers of paint hidden under the frisket.

Finally all the masking is removed and the painting is ready for me to paint in the leaves, flowers & stems.

I start by painting the center of the flowers. This adds balance to my painting as I work my way through the painting process

I love seeing the image come to life.
Shaping the flowers is like creating magic.
My finished painting

If you are trying to create a beautiful background wash full of color and want to save your whites you might try pouring your watercolor paints. This technique allows you to be free of all constrictions as you let the paint run freely on your paper.

Have fun trying this painting process and share you results with me. I would love to post your achievements.

For complete step by step instruction please visit my previous Blog posts.

POURING WATERCOLOR https://lorrainerimmelin.wordpress.com/2019/06/18/pouring-watercolor/

POURING WATERCOLOR / PART 2 https://lorrainerimmelin.wordpress.com/2019/08/02/pouring-watercolor-part-2/(opens in a new tab)


Paint with Me


Pouring Watercolor /Part 2

•August 2, 2019 • 5 Comments

(Part 1 https://lorrainerimmelin.wordpress.com/2019/06/18/pouring-watercolor/(opens in a new tab)

After allowing the paper to completely dry it’s time to apply a 2nd layer of making fluid. I carefully apply the mask, which will save the new flower & leaf shapes in a lighter value.

2nd layer of mask

The areas in white mask are going to be the original white of the paper. The areas where the 2nd layer of mask was applied are saving the light value color from the 1st pouring


The entire paper must be wet to start the 2nd pouring. Use clean water and a large soft brush. Use a very light touch as you apply the water. You do not want to lift the paint that has already dried on the paper. USE VERY LIGHT PRESSURE

Have fun pouring your 2nd layer of paint. I slightly darken the value of the paint by adding more pigment to each color cup.

I pour off the excess liquid paint once I have achieved the desired saturation of colors. I always let the paint sit a minute or two before I tilt the board and let the paint drip off into a tray.

This is the dried painting. I have completed 2 layers of masking fluid and 2 layers of paint.

Once this is dry I can start my 3rd layer working exactly as I did for the previous layer. I will mask out additional leaves, stems & flowers. Mix more pigment into the color cups, since this is my final pouring I want to make sure I achieve some nice rich darker colors in the background

When I want better control of the paint I will use a large brush for the application. I do this mostly at the end of the pouring process especially when I don’t want the colors to spread into areas where I want to keep the color or value lighter than the color I am now adding.

This is the dried painting.

All the blotchs and spots are the paint drying on the many layers of mask. I will let this completely dry before I start to remove the masking.

The pouring process is fun and easy . You can create beautiful layers of colors and work freely knowing you saved all many interesting shapes. Once the mask is removed I take my time deciding how I want to paint the flowers.

Coming Next Part 3 Removing the masking and completing the painting


Paint with Me


Pouring Watercolor

•June 18, 2019 • 5 Comments

How to loosen up your watercolor paintings

Many times while teaching a watercolor workshop I am asked this question “How do I loosen up my watercolor painting style” There are a number of ways to make this happen and pouring watercolor is one way because as we pour paint we must let go of the control we have when painting with a brush.

Lets get started by mixing our red, yellow & blue by adding water & mixing each color in individual containers.

Next we need to transfer our image onto watercolor paper. Now decide where you want to save the white of the paper and mask out those areas. Let the masking dry.

Wet the paper using clean water

Lets start pouring the paint

Drop a small amount of yellow then drop some red onto the wet paper. Using your fingers spread the paint across the paper.

See how beautifully the paint moves and blends on the paper.
Pour off any excess paint
Pour off any excess liquid paint .
Using a clean tissue blot up any puddles that form on the masked areas .

I have applied 1 layer of mask and did 1 pouring.

This is the dried painting. It is ready for another layer of mask and then I will start the 2nd pouring.

Coming soon, the continuation of Pouring Watercolor

Paint with Me

Masking & Watercolor

•March 5, 2019 • 1 Comment

Lately I’ve been struggling to find the time to paint and when I finally carve out some me time in the studio my next challenge is to actually be able to share my love of watercolor with you here on my Blog. I thought I would give you a quick visual of another painting in which I used masking tape to save the white of my paper in these 2 tree shapes.

At the Edge 1
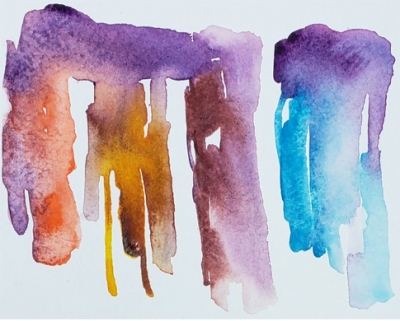
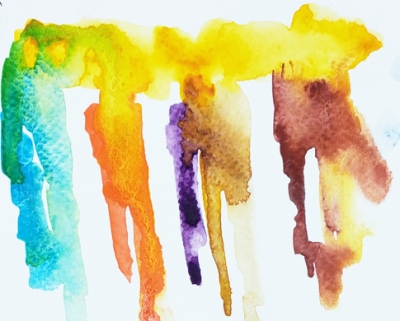
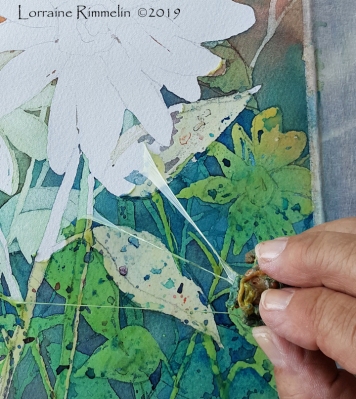
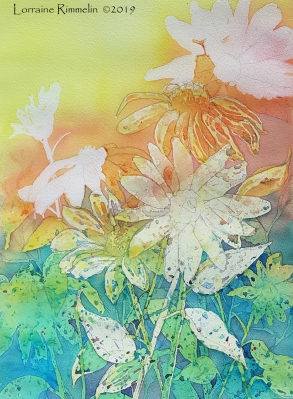
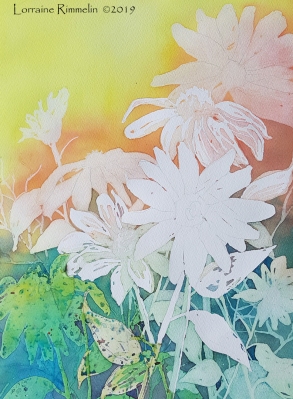
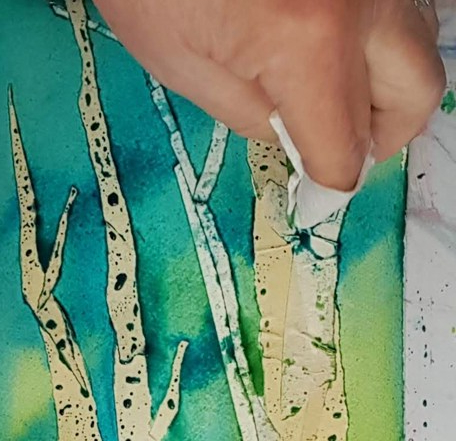
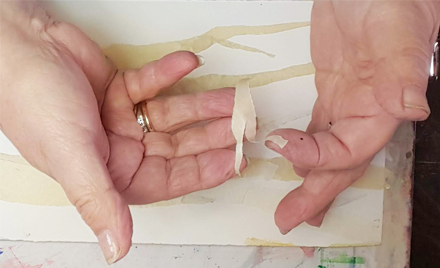
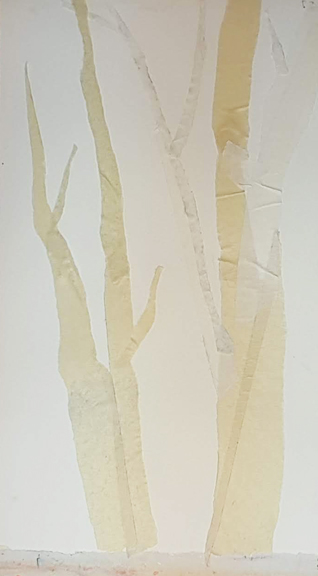
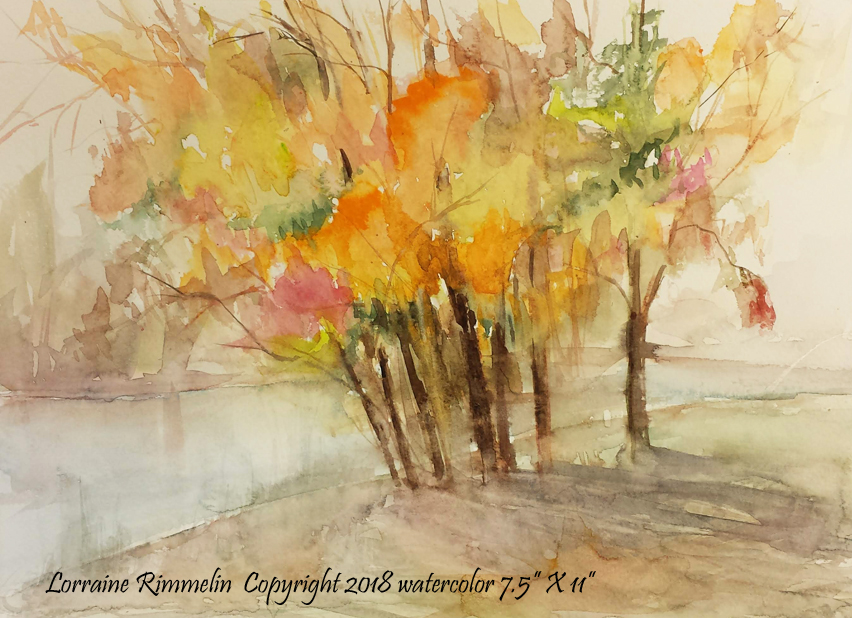
In this first image I already removed the masking tape which created the white tree shapes. Prior to removing the tape tape I painted the background. Saving the white of the trees give me the opportunity to paint a colorful background in a darker value than the trees.
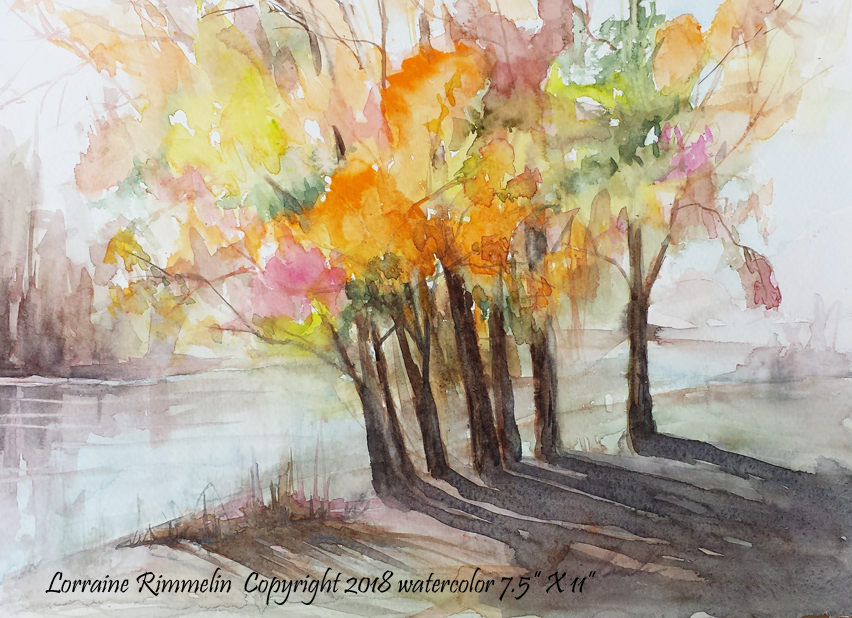
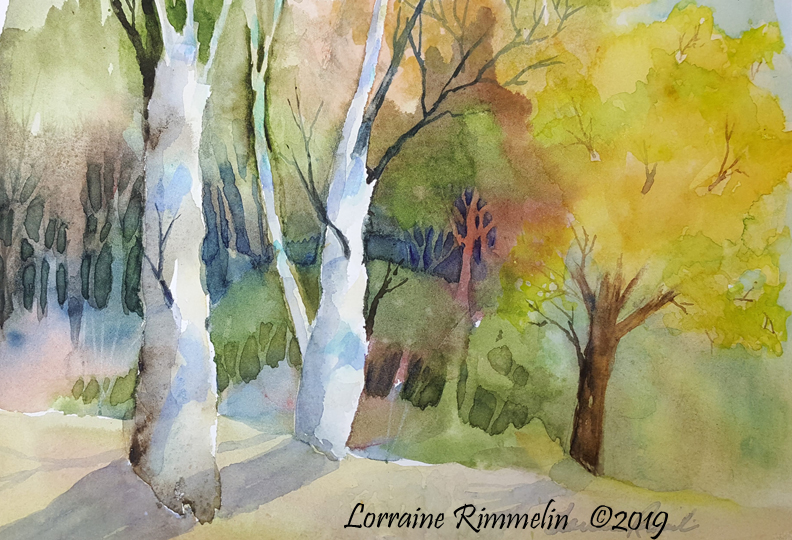
After removing the tape I begin to paint the trees bringing them to life with shape & color

At the Edge

I added the tree on the right which sits in the sunlight and gives the painting a warm glow. Now that I’ve had time to really look at this painting I think I will add a warm color to the right side of the trees and a little more warmth where the sun is reaching the ground.

It’s so easy to use masking tape on your watercolor paper to save the white. Think of where you could use this technique and give it a try.

_____________________________________________________________________________________________

Paint with Me

______________________________________________________________________________________________

Watercolor Painting – Using Masking Tape Pt 2

•January 29, 2019 • Leave a Comment

I’m back in the studio completing my painting using masking tape to save the white tree shapes.

I have finished arranging the masking tape into tree shapes on my paper, now I will start painting the background. I am using blue & green paint and I am mixing the colors on my paper. I love the way my pigments flow and mingle as I paint. I am painting the wash over the entire paper including the taped areas.


The background wash is complete.

masking tape pt2c

I carefully use a tissue to clean off the excess paint that puddled on the tape. I do not want it to run back into the painting.

masking tape pt2d

When the paper was completely dry I removed the tape. You may use a blow dryer to speed up the drying process.

Now it’s time to paint the trees, have fun and be creative. Remember not to paint the trees too dark. If you wanted dark trees there would be no reason to safe the white of your paper.

This is the completed painting. Notice how clean and colorful the background wash is. The edges of the trees look natural because of the torn tape effect.

masking tape pt2j

I used the masking with tape technique to save tree shapes but there are plenty of usages I could think of where I would use this to save my whites. A rooftop covered in snow. The sunny side of a flower pot. A fence in a garden. Flower petals.

Let me know how you used this technique in your painting.

If you missed Masking with tape pt 1 click here

________________________________________________________________________________

Paint with Me

________________________________________________________________________________

Watercolor Painting – using Masking Tape Part 1

•January 22, 2019 • 1 Comment

I’ve been back in the studio trying to catch up on all the months I have missed because of family obligations. Now it’s my time to paint and share more exciting techniques of painting with watercolor

Knowing how to save the white of the paper is essential in watercolor painting. You can purchase a masking fluid or frisket to save the white. It’s easy to apply the frisket to the areas you want to maintain the  white, let it dry and paint right over the frisket. When the paper is dry you peel off the frisket and you have the white areas or shapes you intended to save.

You can negative paint around the areas you want to remain white. I prefer this technique because I love negative painting but sometimes it’s not the best option for saving the white of the paper.

Here’s where masking tape comes in handy. I’m referring to the plain old making tape you have lying around your home or studio. You know the beige colored tape you might have bought at the dollar store.

Watch how I use it to save the white trees in this painting

First I need to tear the tape into long strips. I’m using a 1 inch tape tearing it length wise. Do not cut the tape, you must have a ragged torn edge for this technique to work.

Place the strips of torn tape on the paper shaping it to form a tree. The second piece of tape is placed back to back with the first strip. It is extremely important to place the uncut edges against each other and the torn edges, or straight edges, on the outside or bark edge of the tree. The placement of the torn side of the tape will give your trees and branches a rough edge making it look like the uneven surface of the tree bark. You don’t want to have a perfectly straight tree shape.


masking with tape 8

With practice you can learn to tear the tape again to create even thinner branches. There is no limit to the size of the trees & branches you can make.

masking with tape 9

Take you time and place the torn pieces of tape onto the watercolor paper creating tree shapes. Make sure you press down all the edges so no paint gets underneath the tape. Once you have all your trees shaped out of tape you are ready to start the painting process. You can paint right across the entire paper while preserving the white tree shapes.

In part 2-  I will show you the painting process and removal of the tape.

To go directly to part 2 click here __________________________________________________________________________

Paint with Me

_______________________________________________________________________________________

Watercolor Artisan not Architect

•August 6, 2018 • 5 Comments

When I took my first baby steps as a watercolor artist I had no drawing skills. My beginner paintings didn’t contain much except sky & water. I wasn’t confident enough to add a tree, a road or the most frightening subject of all a building. Through the years I’ve challenged myself and discovered I loved painting animals and landscapes. Dogs became a joy to paint. But I shied away from the dreaded structure of buildings. Mostly because I felt that I had to study perspective and understand viewpoints to draw it correctly.

I’m not sure why I felt this way. I never worried about a dog or chicken painted in unrealistic colors or missing body parts, like half a head. I’m fine with that lost & found look. Buildings just alluded me.

In my recent class with Fabio Cembranelli I was fascinated by his paintings of doors and windows. Using his reference photo I gave it a try.

This is my painting


Fabio My Door

I’m not sure why I felt so intimidated to paint a structure. It’s really no different from painting any other subject. Transfer the image to paper and have fun with the values, shapes & colors.

Knowing I’m a designer not an engineer allows me to create the doorway in a style of my own using the colors that I like. Flowers are the same whether they are growing in a garden, in a pot or on a wall.

This may not be my best painting but it was a painting process filled with all the things I like best about painting. My palette containing beautiful colors, friends around me working on their art and a teacher encouraging me to go for it.

Thanks Fabio for a wonderful classroom experience. I will attempt to paint the beautiful windowers you demonstrated for us. Your shuttered windows and balconeys were breathtakingly beautiful.

_________________________________________________________________

Lorraine Rimmelin

_________________________________________________________________

http://www.watercolorartisan.com

Improving My Watercolor Paintings

•July 28, 2018 • 2 Comments

Attending a workshop, with a highly regarded artist/teacher excites me on 2 levels. First as an artist I am stimulated by seeing an artist I admire painting. Watching the movement of the hands as he creates each brush stroke is delightful to see. It’s like watching a great conductor leading a orchester. Beautiful art being created right before your eyes. Second, as a teacher of watercolor I learned so many tips and simple ways to help my students understand the information pertaining to advancing as a watercolor artist.

It’s a great feeling to have someone to help guide, critique and offer me direction while I am painting. Fabio was extremely helpful and I will share some of the paintings I did during the class and show you how he helped improve my art.

In this first example Fabio suggested I darken the shadows of the trees and add a little bit darker river bank on the opposite side of the water. I can see the improvement in the finished painting.


Fabio Trees 1a

Bank of Trees – before

Fabio Trees 1b

Bank of Trees – after

___________________________________________________________________

In this second example Fabio suggested I add a little more background to support the flowers. I do feel it gives the flowers a better foundation to rest on.


Fabio Flowers 1

A pair of Roses

Fabio Flowers 1b

A Pair of Roses – finished

______________________________________________________________________

In this third example Fabio had very good suggestions. He said I needed to separate the birds, they were blending into one another and that they needed a darker background which would help show them off better.

Fabio Chickens 1

Angry Birds

Fabio Chickens 1b

Angry Birds – finished

______________________________________________________________

Sometimes during a class a suggestion will be made and if I do not agree with the teacher and I like my painting just the way it is I won’t change a thing. In this class I felt that each critique I was given would help my art so I was happy to make the adjustments and I have to say I’m very pleased with the finished paintings.

I now know a few new things about watercolor painting that I didn’t know before this week-long workshop and I’m going to make a few slight changes in my teaching style in my future classes.

Spending 5 days with Fabio Cembranelli was a gift to myself and I look forward to his next NY workshop in 2019.

________________________________________________________________________

Lorraine Rimmelin

______________________________________________________________________